Print Export (PDF & PNG)
Create professional print-ready designs with high-resolution exports perfect for commercial printing.
What You Can Print
PinePaper Studio supports creating static print materials. Here’s what works best for print:
| Works Well for Print | Not Recommended for Print |
|---|---|
| Posters and flyers | Animated content (use video instead) |
| Business cards | Typewriter animations |
| Social media graphics | Moving patterns |
| Presentation slides | Sparkle/blast effects |
| Infographics | Looping animations |
| Banners and signage | |
| Album covers | |
| Book covers |
Tip: Animations don’t appear in print exports. If your design has animations, the export captures the current frame as a static image.
Print Paper Sizes
PinePaper includes professional print presets at 300 DPI (print quality):
ISO Paper Sizes (A-Series)
| Preset | Dimensions (px) | Physical Size | Common Uses |
|---|---|---|---|
| A3 Portrait | 3508 × 4961 | 297 × 420mm | Posters, large prints |
| A3 Landscape | 4961 × 3508 | 420 × 297mm | Wide banners |
| A4 Portrait | 2480 × 3508 | 210 × 297mm | Standard documents, flyers |
| A4 Landscape | 3508 × 2480 | 297 × 210mm | Certificates, calendars |
| A5 Portrait | 1748 × 2480 | 148 × 210mm | Booklets, invitations |
| A5 Landscape | 2480 × 1748 | 210 × 148mm | Postcards, small flyers |
US Paper Sizes
| Preset | Dimensions (px) | Physical Size | Common Uses |
|---|---|---|---|
| Letter Portrait | 2550 × 3300 | 8.5 × 11" | Standard US documents |
| Letter Landscape | 3300 × 2550 | 11 × 8.5" | Presentations |
| Legal Portrait | 2550 × 4200 | 8.5 × 14" | Legal documents |
| Tabloid/Ledger | 3300 × 5100 | 11 × 17" | Large format prints |
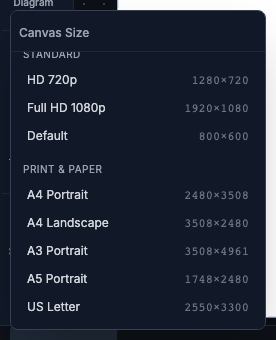
Setting Canvas Size for Print
- Click the Canvas Size button in the header (or press Shift + C)
- Select the Print category
- Choose your desired paper size preset
- Design your content within the canvas
PDF Export
PDF is the standard format for professional printing. PinePaper exports high-quality PDFs with optional bleed and trim marks.
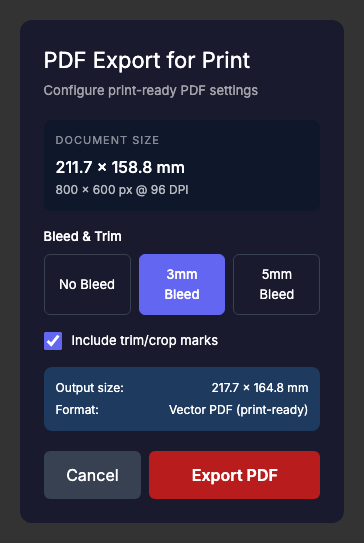
How to Export PDF
- Click Export in the header (or press Ctrl/⌘ + E)
- Select PDF for Print in the Print & Static section
- Configure your export options:
- Bleed: Extra margin that extends beyond the trim line (0mm, 3mm, or 5mm)
- Trim Marks: Crop marks that show where to cut
- Click Export PDF
Understanding Bleed
Bleed is extra image area that extends beyond the final cut edge. Print shops need this because:
- Cutting isn’t perfectly precise
- Bleed prevents white edges if the cut is slightly off
| Bleed Setting | When to Use |
|---|---|
| 0mm | Screen/digital only, home printing |
| 3mm | Standard commercial printing (recommended) |
| 5mm | Large format printing, print shops that require extra bleed |
Important: When using bleed, make sure your background or design extends all the way to the canvas edge. The bleed area adds extra pixels around your design.
Understanding Trim Marks
Trim marks (also called crop marks) are small lines in the corners that show exactly where to cut the paper. Professional printers use these as guides.
Enable trim marks when:
- Sending to a commercial print shop
- Your design goes edge-to-edge (full bleed)
Disable trim marks when:
- Printing at home
- Your design has white borders
High-DPI PNG Export
For maximum quality and compatibility, export as high-resolution PNG.
DPI Options
| DPI | Use Case | Output Size (A4) |
|---|---|---|
| 150 DPI | Draft prints, proofing | 1240 × 1754 px |
| 300 DPI | Standard commercial print | 2480 × 3508 px |
| 600 DPI | Ultra-high quality, large format | 4960 × 7016 px |
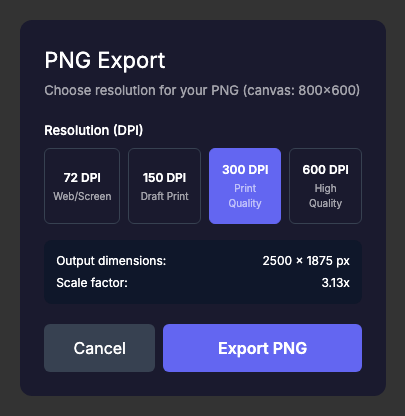
How to Export High-DPI PNG
- Click Export in the header
- Select PNG in the export dialog
- Click More Options to see DPI settings
- Select your desired DPI:
- 150 DPI (Draft Print)
- 300 DPI (Print Quality) - Recommended
- 600 DPI (High Resolution)
- Click Export PNG
Browser Limits
Very high-resolution exports may hit browser memory limits:
| Browser | Maximum Canvas Size |
|---|---|
| Chrome/Brave/Edge | ~16,384 × 16,384 px (268M pixels) |
| Safari (macOS) | ~8,192 × 8,192 px safe (67M pixels max) |
| Safari (iOS) | ~4,096 × 4,096 px (16.7M pixels) |
| Firefox | ~16,384 × 16,384 px (268M+ pixels) |
Note: Safari on iOS has stricter limits. If you’re designing for print on an iPad, use smaller canvas sizes or export from a desktop browser.
If your export fails, try:
- Using 300 DPI instead of 600 DPI
- Reducing canvas size
- Using a different browser (Chrome recommended)
Need guaranteed high-resolution exports? Browser limitations can be frustrating for professional print work. Vote for the Cloud Export API feature to help us prioritize server-side export services that bypass browser memory limits.
Best Practices for Print Design
Color Considerations
- PinePaper works in RGB color space
- For professional printing (CMYK), colors may shift slightly
- Test print a sample before large print runs
- Avoid very bright/saturated colors that may not reproduce well in CMYK
Resolution Tips
- Always use 300 DPI minimum for commercial printing
- Use 600 DPI for text-heavy designs or when enlarging
- Vector elements (shapes, text) scale perfectly
- Raster elements (imported images) should be high-resolution source files
Text for Print
- Use clear, legible fonts at readable sizes
- Minimum body text: 8pt (for viewing at actual size)
- Minimum caption text: 6pt
- Bold text reproduces better than thin/light weights
Safe Margins
Keep important content away from edges:
| Print Type | Safe Margin |
|---|---|
| Home printing | 6-12mm from edge |
| Commercial printing | 3-6mm inside trim line |
| Bound documents | 15-20mm on binding edge |
When to Use PDF vs PNG
| Use PDF When | Use PNG When |
|---|---|
| Sending to print shops | Uploading to online printers |
| Need trim marks and bleed | Need to edit further in other software |
| Professional commercial printing | Quick home printing |
| Vector quality is important | Transparency is needed |
Troubleshooting
Export produces blank or small file
- Ensure your canvas has content
- Check that content is within canvas bounds
- Try exporting at lower DPI first
Colors look different when printed
- RGB to CMYK conversion causes some color shift
- Very bright colors (especially neon/electric) shift the most
- Print a test copy before large runs
File is too large to upload
- Use 300 DPI instead of 600 DPI
- Use PDF (generally smaller than PNG)
- Reduce canvas size if possible
Text appears blurry in print
- Use 300 DPI minimum
- Avoid very small font sizes (below 6pt)
- Use bold weights for small text